What every developer should know about OAuth
In software development, ensuring the security of API calls through robust authorization and authentication is crucial. Developers must secure their API endpoints to handle the escalating cybersecurity threats prevalent in modern software development. In this blog post, we outline key aspects of OAuth, the de facto standard for authorization, to provide the basic building blocks for writing secure applications for most industries and enterprises that can be the target of malicious cyberattacks.
Basic elements in OAuth
In OAuth, key components include the authorization server, client, resource server, and resource owner.
- Client: Represents the application seeking access to protected data. For example, a smartphone app or a web page.
- Resource server: Serves as the backend API containing the desired data.
- Resource owner: Signifies the user who owns and controls specific data on the resource server. For instance, each Gmail user is the owner of their respective email account.
- Authorization server: Acts as the provider overseeing access to resources for both clients and users.
The following diagram illustrates a standard process for authorizing an API call:
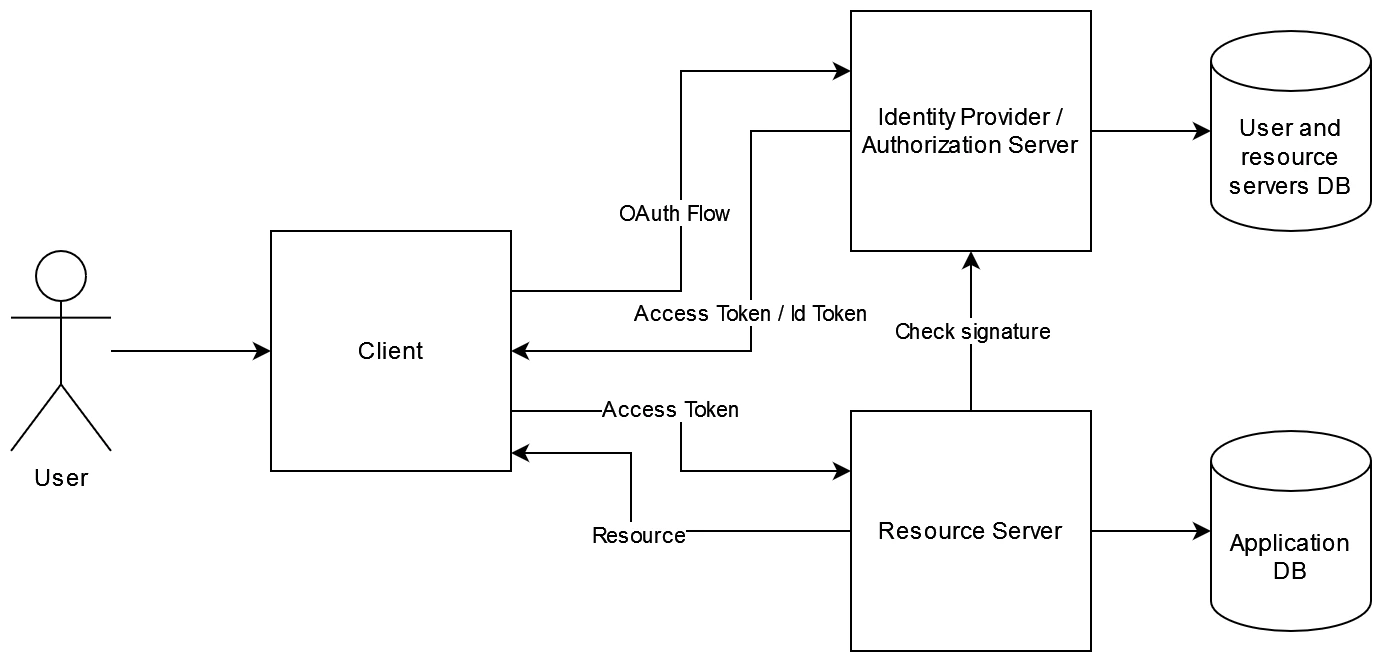
The crucial point to emphasize is that the resource server and the authorization server are distinct entities. Our resource server authorizes any incoming call by validating the access token received from the authorization server once the OAuth flow had been successful. It doesn’t concern itself with the identity of the user making the call; it simply ensures that the access token is valid for the endpoint being invoked.
How do we handle diverse permission levels? Different users may have distinct access rights to resources. The responsibility for managing this lies with the authorization server, as it is the entity tasked with issuing tokens that may be valid for some endpoints but not for others. The API only checks the validity of the Access Token it gets.
Verification of Access Tokens will be discussed in a later section of the blog post.
Client implementation: OAuth flows
To start, we must incorporate the OAuth flow into our client to authenticate and obtain an Access Token for communication with the API. It’s important to emphasize that we refer to any program intending to make API calls as a client.
As developers, we must recognize various application types for call authentication. All calls require authentication, but the methods vary. For instance, a human user can log in interactively and solving remediations an authentication challenge may impose (e.g., MFA, email verification…), while a backend application calling another backend application cannot. When we are implementing the client application that access the API we need to know the type of flow to use so we can configure it in our frontend client, background application, or esentially, any code that access the API.
OAuth offers multiple authorization flows, with the most common ones being as follows:
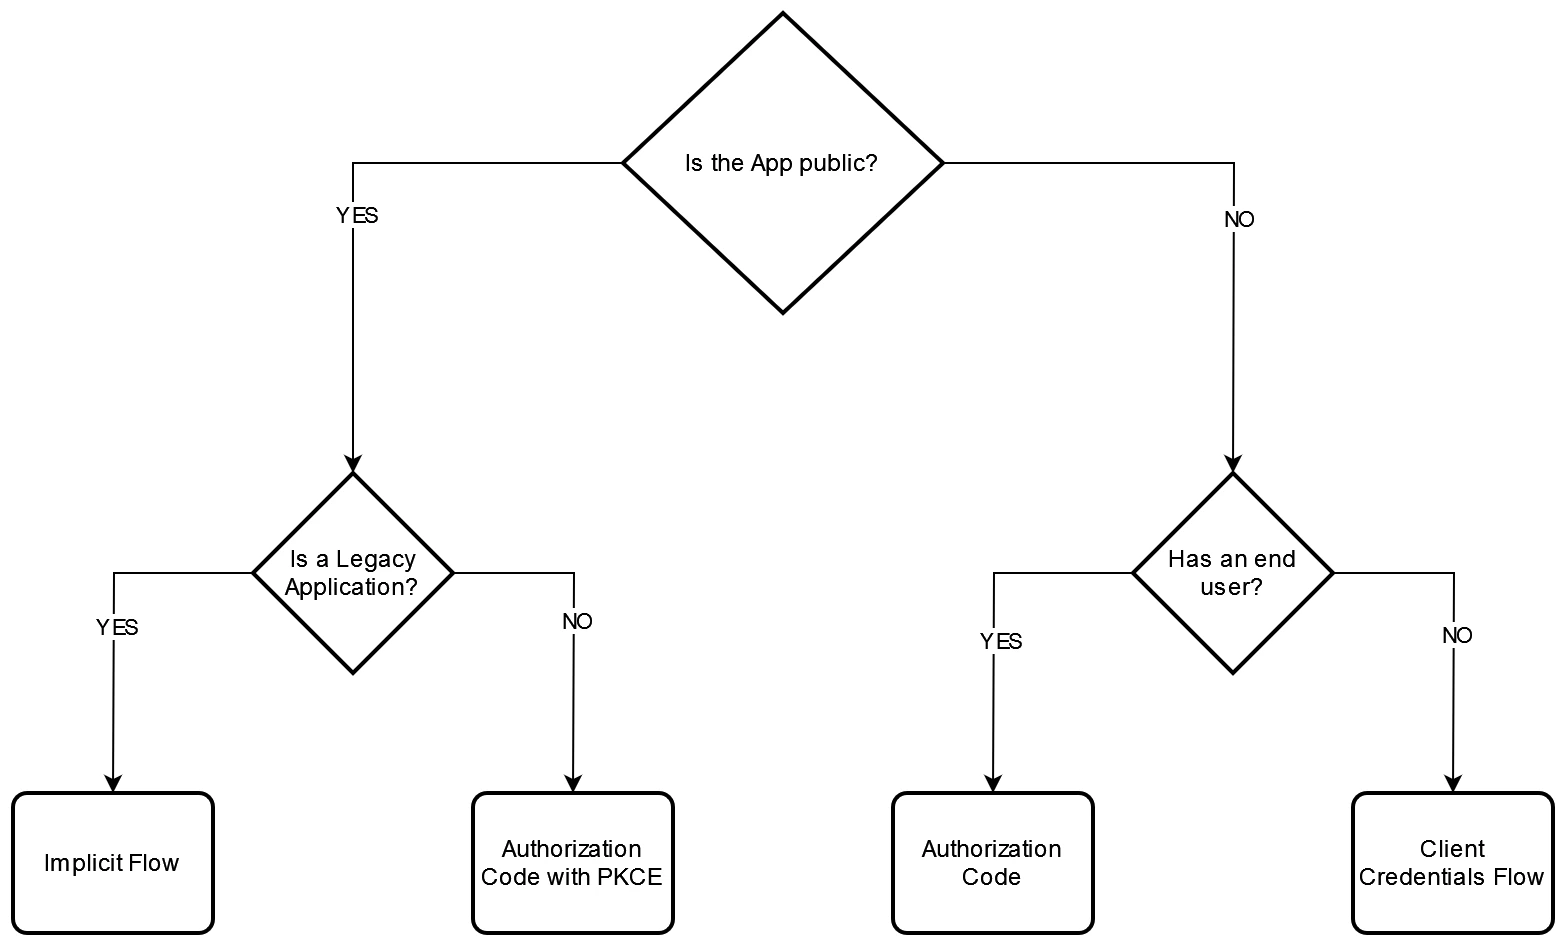
This diagram helps us determine the appropriate flow to implement in our application. Initially, we need to know whether the application is interactive (involving a human user) or non-interactive. Additionally, we must consider whether we have control over the client or not.
Interactive flows
In interactive environments where human users are present, we encounter flows tailored to these scenarios. Here, we differentiate between two types of clients.
Public clients
Public clients reside in machines beyond our control, such as mobile phones, personal computers, or single-page applications in web browsers. Due to their external nature, these clients are considered untrustworthy, susceptible to tampering (e.g., altering JS code or decompiling the application).
The preferred flow for such clients used to be the Implicit Flow; however, it is now deprecated in favor of the more secure Authorization Code with PKCE. Note that the latter requires client support for specific cryptographic operations. Legacy applications might lack this support and, therefore, can only employ the deprecated Implicit Flow.
Examples of public clients include Smartphone Apps or Single Page Applications.
Private clients
In contrast, private clients are within our control, allowing for secure use of secrets. These applications are trustworthy as they exist on machines accessible only to us.
The optimal flow for these clients is the Authorization Code.
Examples of interactive private clients are server-side web applications.
Non interactive flows
We commonly refer to these processes as machine-to-machine authentication. Since all non-interactive flows are private clients by definition, secrets can live in those clients to authenticate. The straightforward Client Credentials flow is employed for authenticating calls between backend services in a microservices architecture.
The Resource Owner Password Flow comes into play for simulating real user interactions in automated tests. It’s crucial to note that this latter flow is only suitable for scenarios where we have complete trust and control over all elements involved, since is a very simple flow that must not be used in production environments.
Resource Server implementation: Access Token verification
Once the authorization server provides us with an Access Token, we can utilize it to make authenticated calls to our resource server. To ensure secure access, we must verify the validity of received Access Tokens in the endpoints. Here’s how we can accomplish this.
The protocol doesn’t explicitly mandate the use of a JWT (JSON Web Token) as format for the Access Token, but it has become the de facto standard. JWT comprises attributes with values referred to as claims, which are the elements subject to verification. Since the authorization server cryptographically signs the JWT, we can trust that the claims are accurate and haven’t been altered to grant unauthorized access to any resource.
To inspect the claims of a token, you can easily use a web page like jwt.io.
Remember that an access token is a short-lived secret by itself. Be very mindful where you paste the token since a malicious website can steal it.
These are some common claims we might find in an Access Token:
- Issuer (iss): usually the URI or ID of the authorization server that created the token.
- Subject (sub): this is the ID of the authenticated user.
- Scopes (scope): the scopes the Access Token is allowed to use. This esentially grants the fine grained permissions for each endpoint.
- Audience (aud): this is the URI or ID of the resource server the token was issued for.
- Authorized Party (azp): this usually refers to the URI or ID of the client that requested the token for calling the resource server.
- Issued At (iat): time of issue.
- Expiration time (exp): time of expiration.
For example, a JWT Access Token might look like this:
{
  "iss": "https://my-auth-server-domain.com/",
  "sub": "123456",
  "aud": [
    "https://example.com/health-api",
    "https://my-api-domain.com/userinfo"
  ],
  "azp": "my_client_id",
  "exp": 1311281970,
  "iat": 1311280970,
  "scope": "openid profile product:read admin:read"
}
When developing a new API, we must ensure that the aud claim matches with the resource server’s ID. This is crucial as it verifies that the token is specifically issued for authorizing calls to our API. Otherwise, a user possessing a token for another application could potentially gain unauthorized access to the data.
Furthermore, every endpoint in the API should be safeguarded by a scope, which is a fine grained permission that an Access Token must have in order to be able to call a particular endpoint. For instance, a GET request for ‘products’ should validate that the token includes the product:read scope. Similarly, POST or DELETE calls related to ‘products’ must be accompanied by the product:write scope.
These two checks —audience and scopes— are the basic manual verifications that developers need to implement. Typically, the library provided by your authentication provider should automatically handle tasks such as checking expiration dates, the issuer and ensuring the validity of the access token’s signature.
We can implement additional checks based on our specific needs. For instance, verifying the Authorized Party claim is useful when we want to control the client accessing the API.
Configuration of the Authorization Server
Finally, we have to configure our Authorization Server to accommodate the new application and prepare it to issue tokens that we can verify.
To configure the authorization server correctly, we need to create two objects: a resource server (API) and a client. This varies among providers, but the general idea is always the same:
- The resource server will be assigned an URI or ID, which will be included in the Audience claim of Access Tokens when obtaining one for that specific API. It’s essential to specify the available scopes for precise authorization in the endpoints, such as
product:readandproduct:writein our example. - The client represents a single application making API calls. In case multiple applications are calling the same resource server (e.g., a mobile application and a web application), we must create distinct clients for each. These clients will then have the scopes attached from the resource server. Additionally, we need to configure the type of OAuth flow, and based on the type, the authorization server will provide various configuration values for the client, including a secret for private clients.
Conclusion
In this blog post, we outlined the most important things a developer must take into account when developing APIs in order to secure them, low-level details are usually abstracted away by the libraries from your authorization server provider. If you want to know more about the different types of flows, how are implemented and the different types of tokens you can read the Okta developer documentation and the OAuth Spec.